Keeping your home free from condensation

December 10, 2025

Beat moisture before it becomes mould...

Keeping your home free from condensation and mould


Everyday things like cooking, washing, bathing and even breathing cause moisture, which is released into the air.


Condensation can cause black mould on walls, furniture, clothes and curtains. The mould looks bad and can even damage your health – medical research has found links between mould, house dust mites and illnesses of the throat and lungs. The damp left by condensation will also damage plasterwork and timber windows.


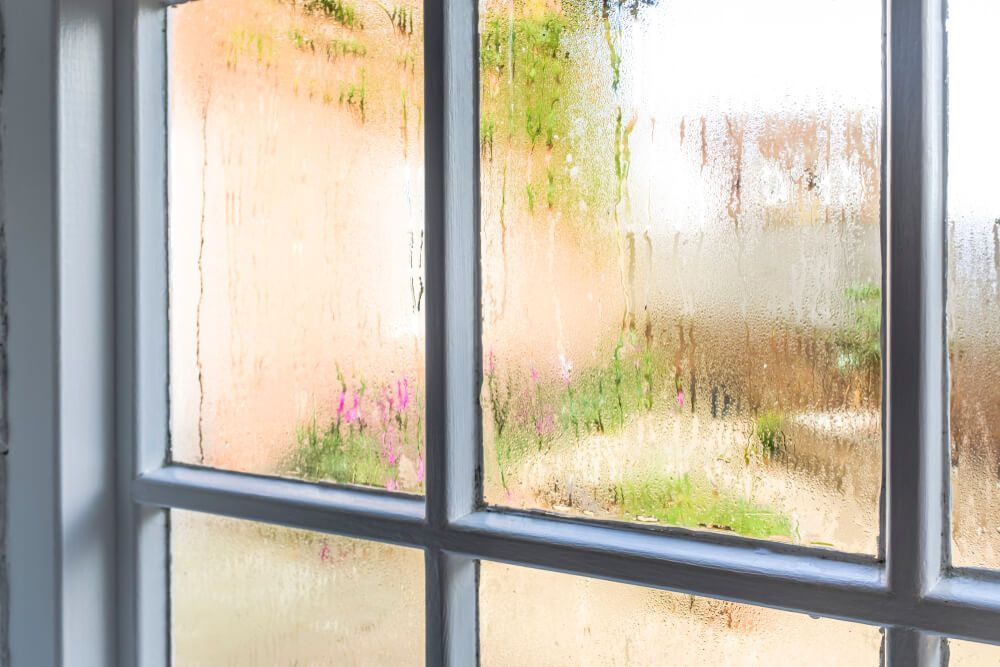
What is condensation and what causes it?


Everyday things like cooking, washing, bathing and even breathing cause moisture, which is released into the air. The air can only hold a certain amount of water vapour – the warmer it is, the more it can hold. If this is cooled by contact with a cold surface such as a mirror, a window or even a wall, the water vapour will turn into droplets of water – condensation. This is what happens when the mirrors mist up in the bathroom.


What does condensation look like?


Every home gets condensation at some time – usually when lots of moisture and steam are being produced such as bath times, when cooking meals or washing clothes.


Fish tanks and indoor plants can also give rise to large quantities of moisture in the air.


It is quite normal to find your bedroom windows misted up in the morning after a cold night, which is to be expected and is not indicative of a serious condensation problem.


If your home never seems to be free from condensation, or you have mould growth as well, read on.


What can you do to reduce it?


1.        Produce less moisture


  • Dry your washing outside the property whenever you can. You can also hang it in the bathroom, keeping the door closed and the window wide open.
  • Never use portable gas bottles or paraffin (flue less) heaters.
  • Permanently vent your tumble drier to the outside of your home, using a suitable kit recommended by the manufacturer of the appliance.
  • While cooking, always cover pans and don’t leave kettles boiling.


2.        Ventilate well to remove moisture


  • When a room is in use, keep a small window and/or trickle vent open.
  • Ventilate bathrooms and kitchens.
  • Keep bathroom and kitchen doors   closed even if they have extractor fans.
  • Ventilate cupboards and wardrobes. Do not overfill wardrobes, let the air circulate freely inside. For the same reason, cut holes in the back panel of the wardrobe and move it 50mm away from the surrounding wall.
  • If possible, locate wardrobes against internal partition walls.


3.        Insulate and heat your home


  • Keep your home warm with insulation, draught proofing and heating, this reduces the risk of condensation.
  • A constant, low level form of heating provides the most economical form of heat and reduces the likelihood of condensation.


How to help yourself


  • Treat and remove the mould – there are various products on the market that will help, such as fungicidal products available in DIY stores.
  • Wipe down windows, frames and other affected areas with a fungicidal, (mould killing wash), that carries a Health and Safety Executive ‘Approval Number’. Make sure you follow the manufacturer’s instructions precisely. Dry clean mildewed clothes and shampoo mouldy carpets.
  • After treating mould affected areas, re-decorate using a good quality fungicidal paint. Where possible remove lining paper and wallpaper, treat the plaster and then paint or paper the area again.
  • There is a balance between heating and ventilation and a de-humidifier may help.


Helpful Guides and News

December 10, 2025
What is a listed building?
Crack measuring
September 8, 2023
Cracking up!
July 7, 2023
It's important to keep on top of pointing to help protect your home and to improve its' aesthetic appeal so we have put together this guide on how to repoint brickwork in 6 simple steps. Generally it is recognised that well-built brickwork requires little maintenance, however as a building ages the mortar will start to decay through natural causes or structural movement. In the event of the above, re-pointing of the brickwork will be required. Ideally, re-pointing should not be undertaken during the winter as there is danger of frost, but, if there is a need to undertake re-pointing in winter, the work needs to be covered against the elements. Re-pointing should commence at the top left hand corner of the area to be re-pointed, working across and then downward. It is advisable to work on 2m² at a time. There are several types of joints for brickwork. For general re-pointing to external brickwork the “weather struck” and “weather struck and cut” joints are most satisfactory for weathering. For older brickwork it is normal practice to try and repeat the original type of joint finish. These are usually a “flush joint” or a “round joint”. The mix of mortar is an essential part of successful re-pointing and the mix should be carefully chosen to suit the brick type, appearance and exposure conditions. General applications: 1:1:6 (cement/lime/sand) Softer facing brick: 1:2:9 (cement/lime/sand) Hard dense bricks in exposed locations: 1:0.5:3 (cement/lime/sand) A soft washed or silver sand is best suited to re-pointing work. The following is a brief outline of the re-pointing procedure. Specification: 1. Rake out the vertical joints of the brickwork then the horizontal to a depth of approximately 15mm. The remaining mortar but be square. 2. Thoroughly brush the joints with a stiff brush to remove any dust or loose particles. 3. Dampen the surrounding area in order to reduce the suction of the existing mortar and bricks. Be careful not to soak the brickwork. 4. Filling the vertical joints (perpends), first press the mortar in and tuck it into the bed joints above and below the perpend. Next fill the bed joint and bound the perpend. Only a small number of perpends should be completed in advance of the bed joints. 5. During pointing, only a relatively small amount of mortar should be mixed to prevent mortar drying out. Never reconstitute the mortar with more water. 6. Once joints are filled, they should be tooled or cut, according to the type of joint to be used. Brush away loose material with a soft brush. If the re-pointing is a result of a crack to the wall, it is suggested that the crack is not pointed independently but a panel surround the crack is re-pointed in order to match the re-pointing with the existing. It is advisable to test the mortar in an out of sight area and let it cure to ensure a good match with the existing mortar is achieved. If the above brief guide is followed, effective re-pointing should be achieved. The information provided should only be used prior to discussions with, and approval of, a qualified professional and re-pointing should only be undertaken following correct diagnosis. For expert advice and surveying services contact us: Cowie Consulting Limited 01325 480 424 info@cowieconsulting.net Here are some examples of poor pointing that we have come across recently which could potentially cause problems such as internal damp or eventual failure of the brickwork, therefore it's important to keep on top pointing to protect weather performance and the integrity of your home.
July 7, 2023
Alan Cowie with his book in aid of Macmillan Cancer Support (Image: Peter Barron, Northern Echo)